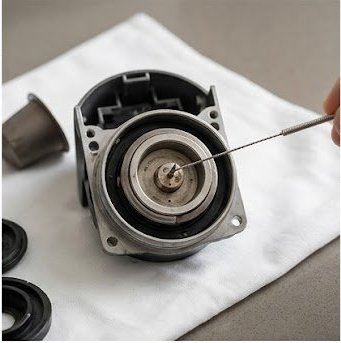
The K-Elite uses two hollow stainless needles to puncture the K-Cup. Both are 1.2mm internal diameter. Coffee oils and fine particulate from pre-ground coffee bridge across this opening within 60–90 brew cycles under typical use — faster with oily dark roasts and pods from budget manufacturers that use finer grind profiles. This guide covers how to identify which needle is blocked and how to clear it without damaging the bore.
These two blockages produce different symptoms. Identifying the correct needle before you start saves time:
| Symptom | Most Likely Cause |
|---|---|
| Coffee streams weakly, takes 3+ minutes to complete 8 oz | Entry needle partial block |
| Coffee spurts sideways, K-Cup overflows or swells | Exit needle fully blocked |
| Pump runs, no water appears at all | Entry needle fully blocked OR pump cavitation — check reservoir seating first |
| Coffee grounds appear in cup | Exit needle bore is enlarged from incorrect cleaning tool (never use a pin larger than 1mm) |
| Gurgling mid-brew, uneven flow | Partial obstruction in both needles simultaneously |
If the paperclip method restores only partial flow, the obstruction is an oil-based plug, not particulate. Coffee oils polymerize at brewing temperatures and form a solid varnish-like deposit that mechanical clearing alone will not remove.
The K-Elite does not have a self-cleaning needle cycle unlike some higher-end Keurig commercial models. Establish a monthly maintenance routine: remove the K-Cup holder, rinse under warm water, and run the paperclip through both needles. This takes under three minutes and prevents the oil-polymerization buildup that the soak procedure is designed to reverse.
If you use aftermarket reusable K-Cup pods, use a medium-coarse grind. Fine grinds pass through the exit needle bore at a higher rate and accelerate obstruction. See the Keurig Master Maintenance Guide for the full monthly cleaning protocol, and use the Descaling Schedule Calculator to pair needle maintenance with your descaling schedule.
The official Keurig needle cleaning tool uses five 0.85mm silicone pins sized precisely for the 1.2mm bore — the correct diameter that clears without enlarging. It inserts into the brew head without disassembly and clears both the entry needle and surrounding residue in one pass. Safer and faster than the paperclip method for users who clean needles regularly.
View on Amazon →As an Amazon Associate, CoffeeFixManual earns from qualifying purchases.
Keurig sells a needle cleaning tool. Is it better than a paperclip?
Marginally. Keurig's brewer maintenance accessory (sold separately, approximately $5) is a silicone pod with five small pins that simultaneously clear both needles when inserted into the brew head. It is convenient and eliminates the sharp-hazard issue. The pin diameter on the Keurig tool is also precisely sized at 0.85mm, which fits the bore without risk of enlargement. The paperclip method works identically if executed carefully, but the official tool is the lower-risk option for users who will be performing this maintenance regularly.
Will descaling clear a needle clog?
No. Descaling solution (citric acid) dissolves calcium carbonate scale — the mineral deposits left by hard water. It does not dissolve or emulsify coffee oil deposits, which are the cause of needle obstruction. These are chemically different problems requiring different solutions. Running descaling solution through a needle-clogged machine will not restore flow.
After clearing the needle, I still get grounds in my coffee. Did I damage the bore?
Possibly, if an oversized tool was used. A bore that has been enlarged beyond its design diameter (1.2mm) will allow fine grounds to pass through. This is not repairable — the needle assembly would require replacement. K-Elite exit needle assemblies are available as aftermarket parts (search for part number K140-EN); replacement requires removing the K-Cup holder and swapping the needle insert, which takes approximately 10 minutes with no tools required.
How often should I clean the Keurig K-Elite needles?
Every 30 days for normal use (1–3 brews per day). Every 2 weeks if you brew dark roasts exclusively or use reusable pods with fine-ground coffee. Every 60 days if you use only Keurig-brand pods with lighter roasts. The paperclip or maintenance tool procedure takes under 3 minutes — schedule it alongside your descaling cycle for the simplest maintenance routine.
CoffeeFixManual provides independent technical information for educational purposes. Always unplug appliances before servicing. Performing repairs may void your manufacturer warranty.