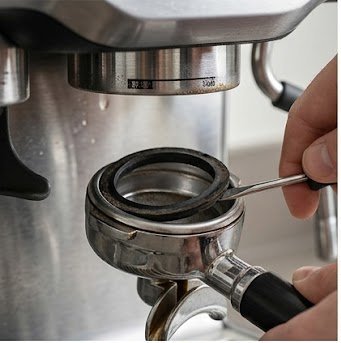
The Gaggia Classic Pro (2019+) uses a 58mm group head — the same diameter as commercial espresso machines. This is a genuine advantage for parts sourcing: 58mm gaskets are the most widely available size in the espresso aftermarket. The procedure below covers the Classic Pro specifically, including the shower screen removal step that the manual omits entirely.
The Gaggia Classic Pro's group head is a solid brass casting that operates as a thermal mass — it holds heat exceptionally well, which is why the machine produces consistent extraction temperatures. The tradeoff: the gasket seats against brass that runs hotter than the stainless or aluminium group heads found in most consumer machines. Brass also has a higher coefficient of thermal expansion than the gasket material, meaning the group head expands and contracts more per temperature cycle than the gasket can fully accommodate. Over time this micro-cycling accelerates gasket hardening.
The Classic Pro gasket should be replaced every 12–18 months under daily use. Inspect it every 6 months: a gasket in good condition is slightly tacky and compresses noticeably when pressed with a fingernail. A gasket requiring replacement feels hard, shows surface cracking, or has visible compression deformation (flat spots). For the full Classic Pro maintenance schedule including OPV adjustment and descaling, see the Gaggia Master Maintenance Guide. Calculate your descaling interval at the Descaling Schedule Calculator.
If you are replacing your group head gasket, this is the right time to run a backflush cycle as well — descaling loosens coffee oil deposits that have been sitting behind the old gasket. Cafiza is the industry-standard espresso machine cleaner used in commercial settings. One tablet per backflush cycle, used monthly, prevents the oil accumulation that accelerates gasket wear and solenoid valve failure.
View on Amazon →As an Amazon Associate, CoffeeFixManual earns from qualifying purchases. This does not affect our editorial content.
The Classic Pro portafilter leaks even with a new gasket. What did I miss?
Three possibilities. First: the shower screen screw is not tight enough, allowing the screen to sit proud of the gasket seating surface — the portafilter then contacts the screen rather than compressing the gasket. Retighten the screw and retest. Second: the new gasket is the wrong thickness — an 8mm gasket in an 8.5mm seat will not compress enough to seal. Confirm your gasket dimensions. Third: a fragment of the old gasket remained in the groove and is preventing the new gasket from seating flat. Remove the new gasket, inspect and clean the groove, reinstall.
Can I use a 58mm Breville gasket in the Gaggia Classic Pro?
Only if the thickness matches. Breville's 58mm machines (Oracle, Dual Boiler) use a 58mm OD gasket but at 8mm thickness rather than the Classic Pro's 8.5mm. A 0.5mm thickness difference is enough to cause sealing issues. Always confirm all three dimensions — OD, ID, and thickness — before ordering a cross-brand replacement gasket.
How tight should the portafilter lock after gasket replacement?
On the Classic Pro, the portafilter should lock at approximately the 4–5 o'clock position (facing the machine from the front). If it locks at 3 o'clock or earlier, the gasket is too thick. If it needs excessive force to reach 5 o'clock, the gasket is slightly too thin or not fully seated. A new gasket that locks at the correct position with moderate hand pressure is correctly installed. After 10–15 heat cycles the silicone will compress slightly and the lock position may shift 10–15° further clockwise — this is normal.
Is the Gaggia Classic Pro shower screen the same as the Classic (pre-2019)?
No. The Classic Pro introduced a revised group head with a different shower screen geometry and screw thread compared to the original Classic. Classic Pro shower screens and screws are not interchangeable with pre-2019 Classic parts. When ordering replacement screens, confirm compatibility with the Classic Pro specifically — many listings describe "Gaggia Classic" without specifying the generation.
CoffeeFixManual provides independent technical information for educational purposes. Always allow machines to cool fully before servicing. Performing repairs may void your manufacturer warranty.